Gray Card for White Balance – Photography Basics
Photography basics discussions often lead to using a gray card for white balance in digital photography. White balance plays a big part in getting the true colors in you images. The AWB, or Auto White Balance setting in modern digital cameras does a very good job of calibrating white balance. However, there are times that the camera misses the mark, and many photographers do not rely on it.
Effects of White Balance
An incorrect white balance will skew the color accuracy in your images. The following images were captured using the same subject, time, and camera settings. The white balance settings are the only difference.


Clearly, a correct white balance setting plays a big part in color accuracy. Color accuracy is particularly crucial in commercial photography where color differential between an image and a product creates inaccurate representation to the consumer. A gray card is an excellent tool to ensure that your images convey the color accurately.
What is a Gray Card?
A gray card is just that, a card, generally plastic, that is gray. It is calibrated at 18% gray, or “middle gray.” It is a tool photographers use to adjust exposure and white balance. In this article, we will be looking at using it for white balance.
Middle gray, or 18% gray, was determined by Kodak as a value that represents the reflective value in a typical sunlit scene. The first light meters were designed to read that value. Kodak then recommended placing one of their film boxes in the scene as the box reflected 18% of the ambient light.
Ansel Adams and the Zone System
Ansel Adams and Fred Archer created the famous zone system around the use of 18% gray to determine proper exposure and contrast. That system gave the clarity and depth that Ansel Adams became famous for. The zone system made middle gray the industry standard for metering. You can read more about the zone system here: https://en.wikipedia.org/wiki/Zone_System
Middle Gray and Your Camera
Digital cameras are designed to use 18% gray. The camera searches the scene for middle gray to set the exposure and AWB. This is where a gray card can be used to establish the correct white balance.
White balance can be set in camera with a custom white balance calibration. In this article, I will go through this process on my Canon 7d. Custom white balance can be done on other digital cameras, refer to your owner’s manual for specifics.
Photo Software
Photo software such as Lightroom and Photoshop offer post processing abilities that work very well. Post processing is my preferred method to calibrate white balance. I will cover white balance calibration in Lightroom in this article.
Purchase a Gray Card
Gray cards come in a very basic version that will get the job done.
Note: the white and black cards are for setting White Point and Black Point in Lightroom and Photoshop. Those operations are beyond the context of this article.
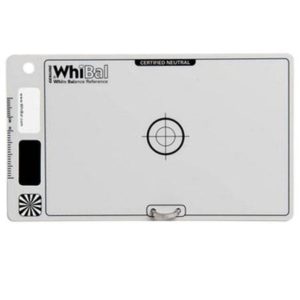
WhiBal makes a very good gray card that is extremely accurate and also has a focus pattern which makes setting up the custom white balance in camera much easier.
Canon Custom White Balance
The custom white balance calibration is done when you are ready to capture the image. If lighting conditions change, it will need to be done again.
Begin the custom white balance procedure by taking a photo of your grey card. If your card doesn’t have a focus pattern, you will have to do this in full manual mode as your camera will not focus without a contrast. Fill the entire frame with the card.
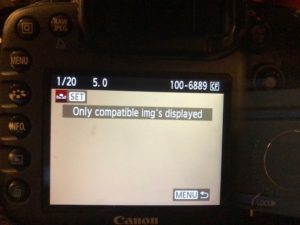
After taking the picture go to the menu and find custom white balance and select it.

The camera will find compatible images, if more than one image appears, choose the photo of your gray card.
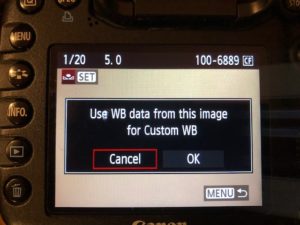
Select the image and select OK as shown in the image below.
Verify custom white balance is set as shown below.
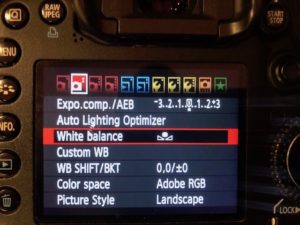
If it is not set to custom, go into the white balance menu item and select it.
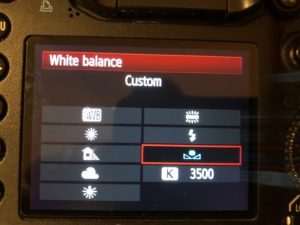
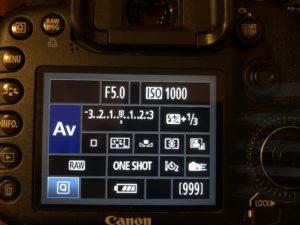
Verify on your LCD display that custom white balance is selected and you are ready to shoot. Remember that the white balance will need to be recalibrated as lighting conditions change.
Software Calibration
To use this feature, you will need to take a photo with the gray card in the scene. You can then synchronize all the images in the set to the same white balance setting. Place the gray card in the scene and take a photo, then remove the card from the scene and take as many shots as you wish. If the lighting changes you will need to take another shot with the gray card in the scene.
Import to Lightroom
Import all your images to Lightroom. Open the image that has the gray card in the scene and go to the Develop Module. With the develop module open, look in the right margin in the “Basic” tools section. You will see a dropper tool next to the letters WB (White Balance.) Click on the dropper and drag it over to the gray card in the image you imported. Click on the gray card with the dropper.
Your image is now adjusted to the correct white balance for the conditions that you shot in.
Synchronize All the Photos
After you have set the white balance for the gray card image, you can synchronize all the photos in the group to the same WB setting. At the bottom of the screen, you will see all the images you just imported. The image you just adjusted will be highlighted. Select the remaining images by holding the shift key and clicking on them. When all the images are highlighted, you can then click in “Sync…” at the bottom of the tools column on the right side of the screen. Click on Sync and all the highlighted photos will adjust to the image you calibrated.
As you can see, this method is very quick and easy. The dropper can be used without the gray card in some cases. I have used the WB tool in Lightroom for some underwater images from a scuba trip that I did not have a gray card available. I simply clicked on the sandy sea floor to get a neutral metering. Colors are skewed from the water and by using the dropper tool, I was able to bring back the reds and reduce the blues.
Summary
As I stated earlier, WB can also be done in Photoshop as well as other software options. I have touched on the basics of a gray card for white balance. The information available about middle gray, or 18% gray is vast, and the science behind it can fill volumes. The intention in this article was to explain how to use the gray card to calibrate white balance in digital photography.
Next article: Understanding Exposure
Previous Article: Photography Accessories – Camera Bags
List of All Articles
Leave a Reply