Understanding Exposure in Digital Photography
Understanding exposure is without a doubt the single most important thing that a photographer must learn to create great images.
Why Is Exposure So Important?
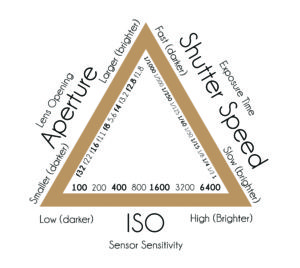
It’s the exposure of a photo that determines how dark or light the photo will appear after it has been captured. In this article, we are going to learn about the exposure triangle. Three elements play a role in the exposure of a photo, namely aperture, shutter speed and ISO. These three settings, if mastered, can help you take great photos. Let’s learn more about them.

ISO
By adjusting the ISO, you can increase or decrease the sensitivity of the image sensor of your camera. The higher the ISO number, the higher the sensitive of the sensor to light. Based on the camera you are using, this value can be between 50 and 6400.
You need to understand and learn the ISO settings if you want to take good photos in different light conditions. For instance, if you want less noise and higher saturation, lowest ISO number should be chosen, such as ISO 100. By contract, if you need more details, opt for a higher ISO, such as ISO 400. Moving from ISO 100 to 200 will double the sensitivity of the sensor, meaning you can enjoy the same level of exposure in half the light.
If you want to capture the early evening skyline, you may need to increase the shutter speed for good photos. Another way is to adjust the ISO. For instance, you can raise the ISO to 3200 to increase the exposure by 5 times.
You can try different ISO settings to take high quality photos in different lighting conditions. One consideration is, depending on your camera model, High ISO can create noise in your image.
Aperture
ISO is all about the sensitivity of your camera sensor, but aperture allows you to control the amount of light that reaches the sensor. Aperture refers to the hole in your camera on front side. Light enters your camera through this opening. If you change the aperture settings, you will see those ring-like or round metal blades move at the camera lens. These blades act like a door to control the amount of light that gets in.
So, increasing or decreasing the aperture allows you to increase or decrease the light that reaches the lens. This setting involves changing the f-stop values. On most cameras, these values are between 1.4 and 22.
The higher the aperture value, the smaller the aperture. Smaller aperture will reduce the amount of light that gets into the camera. On the other hand, a smaller aperture size will mean more light will get in. Moreover, small aperture size will give you more depth of field. By contrast, for a shallow depth of field, you will need to opt for a large aperture size or smaller f-stop number. Remember: each f-stop number will double the amount of light that gets in.
Shutter Speed
When you hit the shutter release button on your camera to capture a photo, you hear a snapping or clicking sound. That’s the sound of the shutter and tells you that the photograph has been taken.
For good photography, it’s important to know how to use the right shutter speed. Shutter is the door that opens up or closes when you hit the shutter release button. Shutter speed determines how long the sensor of the camera is exposed to light.
Typically, shutter speeds are measured in fractions of a second. For instance, if you use the 1/100s shutter speed, your camera sensor will spend one hundredth of a second to capture the photo. Using a higher fraction will tell the camera to take a capture a photo more quickly.
To adjust the shutter speed, you should choose the Shutter Priority (S) or set your camera to manual mode.
Once you have become familiar with the shutter speed, it will be easier for you to add creativity to your photos. For instance, lower shutter speeds will let you add motion blur. On the other hand, faster shutter speeds will allow you to capture object moving at a fast speed. After a bit of practice, you will be able to use this feature of your camera properly.
The Takeaway
If you want to take good photos, you need to work with all of these settings. For instance, if you change just one of the settings, the output may not be what you actually want. If you raise the f-stop to cut down on the amount of light that reaches the sensor, know that you should change the ISO and shutter speed as well for the right exposure. Not doing so will make the image too bright or blurry.
So, this article is an attempt to shed some light on the use of ISO, aperture and shutter speed settings of your camera. Understating these settings will help you get better at your skill, and you will be able to take great looking photos. Practice is the key to capturing stunning photos.
Recommended Reading
A very good source to learn more about exposure is the book Understanding Exposure by Brian Peterson

Next Article: Depth Of Field Explained
Previous Article: Gray Card For White Balance – Photography Basics
List of All Articles

1 response to "Understanding Exposure in Digital Photography"