Depth of Field Explained ~ Photography Tips
Understanding Depth of Field is essential for creating great images. If you are a new photographer, chances are that you don’t know how to use depth of field to create interesting images. You may have seen depth of field abbreviated as DOF, which you will see in this article. Simply put, the term refers to the area of the photo that appears in focus while you are taking a photo.
When viewing different images, you will see that the DOF zone varies. Some photos have a small area in focus, which is known as the shallow DOF. In landscape photos, on the other hand, a wider zone is in focus, and this is known as the DOF.
Controlling DOF is accomplished using three factors: aperture, distance from the subject, and the focal length of your camera lens. Let’s look at how you can make the proper adjustments to create a desired effect.
Aperture And The Depth Of Field
Aperture is measured in f-stop value. This configuration allows you to control the amount of light that passes through the lens and reaches the sensor. The aperture size (the hole through which the light gets into the camera) controls the amount of light entering the camera. By changing the aperture, you also change the DOF.
Shallow DOF = Small f-stop number which is a large aperture
Deep DOF = Large f-stop number which is a small aperture
For shallow depth of field, you need a lower f/stop number. In the same way, for large the f/stop number, the higher the DOF that you can achieve. For instance, the f/2.8 will give you a shallow DOF, while f/22 will give you a deeper depth of field.
The images shown below were shot at 1.8, 2.8, 4, 5.6, 8, 11, 16, & 22. Clearly f1.8 has the narrowest depth of field while f22 has a much wider DOF. These photos were all taken with the same ISO and shutter speed using the same lens with only the aperture changing.

f1.8

f2.8

f4

f5.6

f8

f11

f16

f22
Distance And The Depth Of Field
For a shallow DOF, you need to move closer to the subject. By contrast, moving away from the subject will produce a deeper depth of field.
The following images demonstrate the proximity to the subject and how it affects the depth of field The images illustrate the narrowest depth of field at close proximity and the DOF getting deeper as the camera moves away from the subject. The change in the DOF is clear when looking at the background. All of the images were taken with the same ISO, aperture and shutter speed with only distance to subject changing.


All images in this article were created using a Canon 7d

and a Canon EF 50mm f/1.8 STM Lens.
Lens Focal Length and The Depth Of Field
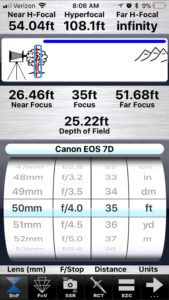
Focal length of a lens allows you to magnify a distant object. In simple terms, the longer the focal length of the lens, the shallower the DOF will be. For instance, on a crop sensor camera such as the Canon 7d if the subject is 35 feet away from the camera, the DOF will be 25.22 feet. The DOF will range between 26 feet and 51 feet with a 50mm lens at f/4.
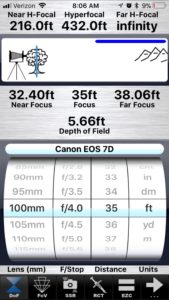
The same arrangement with a 100mm lens changes the DOF to 5.6 feet ranging from 32 feet to 38 feet.
Point And Shoot Cameras And DOF
Adjusting depth of field is easier with a DSLR, but it is possible with a Point-and-Shoot as well. All you need to do is look for the human head symbol in the Scene Modes. The head symbol is ideal for portraits, which will allow a narrow DOF. For deeper DOF, you can choose the mountain symbol (for landscape photos).
Using a DSLR, you need to choose the Aperture Priority mode. This will allow you to configure the f/stop to achieve the desired depth of field. the shutter speed will be set automatically.
F-Stop Considerations When Working With Depth of Field
Changing the f-stop will have an impact on the shutter speed. For example, if you want to increase the depth of field by raising the f-stop, (smaller aperture), you will also need to slow down the shutter speed. If you slow the shutter speed too much you will get camera shake, resulting in a blurry image. A higher ISO will be needed to resolve shutter speeds being too low, so you need to understand these settings if you want to achieve the desired DOF. You can read more about how F-stop, shutter speed and ISO work together in the Exposure Triangle HERE
Use of Shallow Depth of Field
With a shallow depth of field, you can blur the background to make the object stand out. The DOF settings is ideal for portrait photography. Other uses for a shallow DOF are wildlife photography, sports photography, and macro. A shallow depth of field is ideal in these situations to make the subject stand out from the background.
Calculation of Depth of Field
You can search for DOF charts on the Internet based on the camera and lens you own. There are also many apps (as shown in the images above) for smart phones that can be used to determine depth of field very quickly. Additionally, most DSLR of cameras feature a preview button that allows you to see the DOF through the viewfinder.
Depth of Field to Get Everything In Focus
Using a higher f-stop (smaller aperture) will increase the DOF to get everything in focus. Again, you may want to use a DOF calculator or app to figure out the right hyperfocal distance.
Using hyperfocal with the near and far focal points in a DOF calculator will ensure the proper focus for your image. Depending on the focal length of your lens, typically f8 and above will be the best option for getting everything in focus.
Depth Of Field In Macro Photography
DOF in macro photography can be ridiculously shallow, within fractions of an inch. As illustrated above, close proximity to the subject drastically affects DOF. Typically, for a shallow DOF you will want to use the widest aperture setting on your lens. In macro, you may need to adjust to a smaller aperture to obtain a usable DOF.
Another consideration for macro is to use a tripod to ensure that your focal point is where you want it. With such a narrow DOF it can be very difficult to hold the camera in position which can create an image with the focal point being other that=n you intended.
Summary
Understanding depth of field is a essential in creating great images. Whether wanting to isolate your subject with a narrow DOF or using a deep DOF for landscape images, understanding depth of field is very useful.
Next article: Rule Of Thirds In Composition
Previous Article: Understanding Exposure In Digital Photography
List of All Articles
Leave a Reply